

Monday, March 29, 2010
Sock Monkeys...
So I've had these little sock monkey arts I did for awhile but haven't had time to scan them or anything. Finally did that and tweaked it just a bit in photoshop and thought I would share the results of one here. I'd love to do greeting cards or something with them, but I'd probably be the only one who'd like them. LoL!


Saturday, March 6, 2010

Feeling inspired.
For me, the toy aisle of any store has always been a treasure trove of inspiration, obviously. However, when you get older, it's rare you have a reason to go down the toy aisles as much, and even if you do, you have to fight with your children on whether to buy this or that and really don't get to *look* at any of the items there. So, I try to make a trip down these aisles every so often just to see what's new and what kids like and what I like. One such recent trip found me going home with one of these dolls. A Moxie Girl doll. The "Creative" one was my first choice, of course, but after getting her home and finding out how utterly adorable she was, I couldn't stop for going back for the rest, as you can see from the pictures below.

I don't know much about them but did read somewhere on a blog while trying to research them that they're made by the same company that makes the Bratz dolls and apparently were/are going through a sort of custody battle with another company for the rights to those. Therefore, the company came up with these dolls, just in case they lost the lawsuit. Regardless, I think these dolls are much cuter than the Bratz dolls (I've always been a Barbie doll gal myself) so even if they do lose, I doubt they'll have much trouble finding some new buyers for these. :D They also have a much larger version of these (these are only about a couple of inches tall) that you can design with markers and stickers. She comes with little accessories you can design as well. I'll have to wait until next time to get her. ;) Now I just need to get a good office and desk to set these on to enjoy properly. :)

I don't know much about them but did read somewhere on a blog while trying to research them that they're made by the same company that makes the Bratz dolls and apparently were/are going through a sort of custody battle with another company for the rights to those. Therefore, the company came up with these dolls, just in case they lost the lawsuit. Regardless, I think these dolls are much cuter than the Bratz dolls (I've always been a Barbie doll gal myself) so even if they do lose, I doubt they'll have much trouble finding some new buyers for these. :D They also have a much larger version of these (these are only about a couple of inches tall) that you can design with markers and stickers. She comes with little accessories you can design as well. I'll have to wait until next time to get her. ;) Now I just need to get a good office and desk to set these on to enjoy properly. :)
Saturday, February 27, 2010

Friday, February 19, 2010
Booklet
This is a little something I started ages ago for a halloween booklet that I have yet to finish. I thought it was so cute though that I couldn't help but share it. :) Here is the cover and a couple of the pages inside. Happy LATE halloween! :D


Tuesday, February 16, 2010
Some paper collage art

Here's a little something silly I created during a bad snow day where it was too cold and nasty to do just about anything but make art. :)

Monday, February 15, 2010
Something from awhile ago...

I had meant to post this last halloween, or sometime thereafter, but never got around to it. Thought I would share it now since I'll probably forget by next halloween. LoL! Just a little digital craziness I created on my computer. ;)
Sunday, February 14, 2010
Happy Valentine's Day!

Yep, it's another Valentine's Day. :) If you're like me, just about any holiday or occasion anymore calls for some serious scrambling, searching, and pulling everything together at the last minute just to get through the day, much less to thoroughly enjoy it. For those of us, I present the "Oh NO" clown above. :) Happy Valentine's day to all!
Wednesday, February 10, 2010
Wintery goodness

For all those out there who love winter and snow in general, here's a little something fun I created that I thought I would share. The little girl was made with cut paper, scanned in and altered digitally to add the falling snow, tongue, and background. This is a gif image and should move to show her eating the falling snow. If you find that it isn't moving or you can't view the image, please let me know. I probably downloaded it incorrectly. ;)
*All images copyright Mindy Lou Hagan unless otherwise noted.*
Tuesday, February 9, 2010
Homemade sketchbook...attempt number two...
After I had so much fun creating my first homemade sketchbook, I thought it might be fun to do another one (that and the fact that I lost the first one. :P ) So, this time I decided to show more of the steps I used in creating this one. Mind you, this one is more of a travel sketchbook or a journal just to take some quick notes in. However, it is very easy to make and requires mostly some simple materials you probably already have lying around, which, to me, is the best kind of scrapbook to make. :)
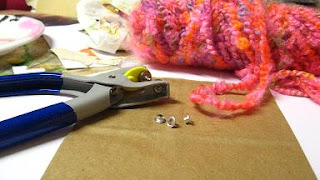
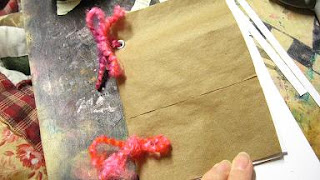
First, take those basic materials, which for me, were: a brown paper bag (this was my cover. I used the kind like you used to pack your lunch to school in, which you can buy in large quanities from your local grocery store or possible craft store), some sort of binding material (I used yarn, but you can use a needle and thread, a sewing machine, or whatever you prefer), some eyelets and an eyelet tool (I'm blanking on what the name of this thing is. See the picture below for references.), and whatever paper you intend to use in your scrapbook.
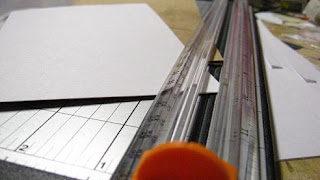
Second, Cut your paper to the desired size. I simply folded my paper baggie in half and measured based on the size I wanted from there. Although if you prefer to be more scientific, feel free to pull our your ruler and measure everything to ensure a better fit. That's the great thing about these homemade sketchbooks. They're made to fit into your needs! Once you have measured and cut your paper (I used a paper trimmer, but scissors will work as well), then proceed to step three.
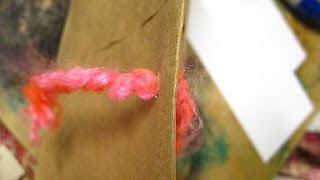
Third, use your eyelets or other binding material, and bind your papers and covers together. If you wish to decorate your cover first, feel free to do so. Just be sure that whatever you decorate with will not be in the way of where you intent to place your binding. For my sketchbook, I placed the eyelets first and then threaded my yarn through them and tied each into a sort of braid.
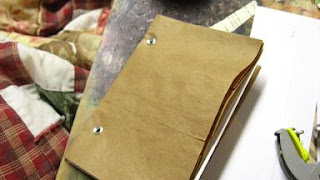
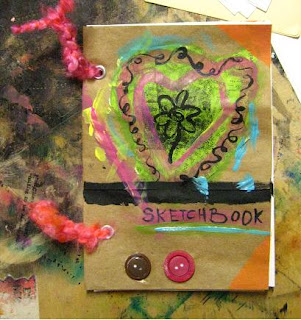
And here is what my finished product came out to look like. It's not beautiful by any means, but it serves as a simple sketchbook or notebook that I can take with my just about anywhere and use with just about any basic medium.
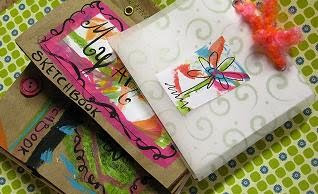
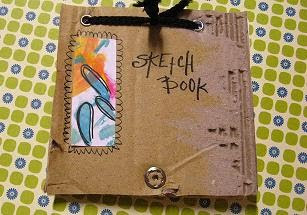
Additionally, I tried several other types of covers and papers and come up with some other types of sketchbooks, which you can see below.
UPDATE: You can view my other sketchbook attempts here and here.
First, take those basic materials, which for me, were: a brown paper bag (this was my cover. I used the kind like you used to pack your lunch to school in, which you can buy in large quanities from your local grocery store or possible craft store), some sort of binding material (I used yarn, but you can use a needle and thread, a sewing machine, or whatever you prefer), some eyelets and an eyelet tool (I'm blanking on what the name of this thing is. See the picture below for references.), and whatever paper you intend to use in your scrapbook.

Second, Cut your paper to the desired size. I simply folded my paper baggie in half and measured based on the size I wanted from there. Although if you prefer to be more scientific, feel free to pull our your ruler and measure everything to ensure a better fit. That's the great thing about these homemade sketchbooks. They're made to fit into your needs! Once you have measured and cut your paper (I used a paper trimmer, but scissors will work as well), then proceed to step three.

Third, use your eyelets or other binding material, and bind your papers and covers together. If you wish to decorate your cover first, feel free to do so. Just be sure that whatever you decorate with will not be in the way of where you intent to place your binding. For my sketchbook, I placed the eyelets first and then threaded my yarn through them and tied each into a sort of braid.


And here is what my finished product came out to look like. It's not beautiful by any means, but it serves as a simple sketchbook or notebook that I can take with my just about anywhere and use with just about any basic medium.

Additionally, I tried several other types of covers and papers and come up with some other types of sketchbooks, which you can see below.


UPDATE: You can view my other sketchbook attempts here and here.
Sunday, February 7, 2010
Looking for her prince...

This is a piece I created with some cut papers, scrapbooking supplies and stamps and inks. After I created it, I scanned it in and added some digital alterations to it to create the final you see below. I'm thinking now that maybe I should do a matching piece of her "prince".
Saturday, February 6, 2010
Elephant Music

This is a little something I created ages ago and just finally got around to scanning in the past few months. It's very simplistic, but I liked it and mostly made it for my mom who has always had a soft spot for elephants, of all things. ;) I've been meaning to add some digital alterations to it, but have yet to get around to it. :P For now, just enjoy it as it is. ;)
Some new pieces for the new year.

Sorry for the prolonged absence over the last few months. Other things have kept me away from posting, however, I desperately need to keep this blog of mine updated, so I plunkered down and decided, 'why not today?' And since Valentine's day is quickly approaching, I decided to do some pieces for it and thought it would be fun to share one or two of those. ;)
Thursday, October 1, 2009
Almost Halloween!
Sorry I haven't posted anything for the past few weeks. Been busy and uncreative. :P However, halloween seems to have rekindled my art bug and I'm suddenly all excited about art again! :D
I just found this awesome website and video today, which I love.
And Holli hosting her Pumpkin Junkin contest again this year, so be sure to enter! ;D
I just found this awesome website and video today, which I love.
And Holli hosting her Pumpkin Junkin contest again this year, so be sure to enter! ;D
Saturday, August 22, 2009

Subscribe to:
Posts (Atom)